Last Updated on September 23, 2026 by Umar Farooq
Concrete patio sealing protects a poured slab from water, stains, freeze-thaw damage and de-icing salt, and it's the one job where the slab's own opinion (a water drop that beads or soaks in) beats any schedule. There are two main choices. A penetrating silane or siloxane sealer soaks in, leaves the concrete looking natural and lasts for years. A film-forming acrylic adds color and sheen but wears faster. On a new slab, wait about 28 days for the concrete to cure. Clean it thoroughly, let it dry, and apply thin, even coats in mild, dry weather. Reseal when water stops beading on the surface.
This page covers a poured concrete slab. Concrete pavers are a different job, with joints, sand and different sealers, and that's covered in the guide to paver sealing.
Is concrete patio sealing worth doing?
For most outdoor slabs, yes. Bare concrete is porous. Water soaks in and freezes, and repeated freezing can scale and flake the surface, especially with de-icing salt. Grill grease, leaves, furniture rust and spilled drinks soak in too. A sealer slows all of it.
It matters most for:
- Cold climates with freeze-thaw cycles and road salt tracked onto the patio.
- Patios under trees or beside a grill, where stains are a constant.
- Stamped and colored concrete, where the sealer also protects and deepens the color.
It matters least on a covered patio in a dry, mild climate. There, a bare broom-finished slab can go years with nothing but cleaning, which is the cheapest sealer ever made.
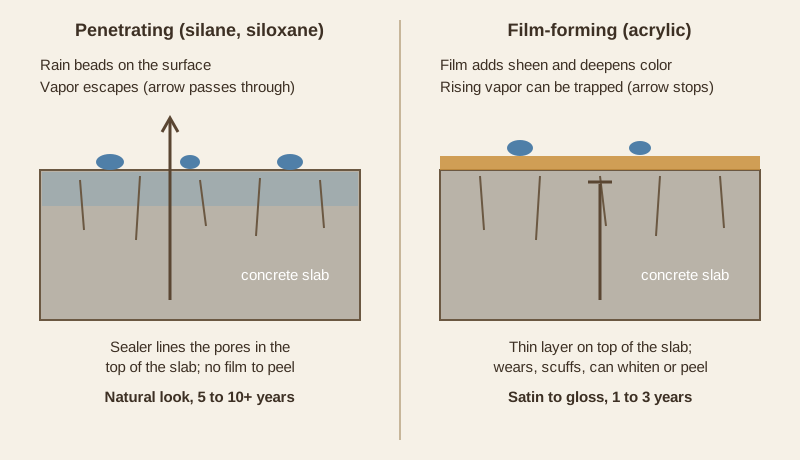
Sealing isn't free of downsides. Film sealers can be slippery when wet, need recoating every few years, and have to be stripped when they fail. Here's my view, and it's a buy-less one: on a plain gray slab, skip the gloss. A penetrating sealer lines the pores instead of sitting on top, so there's no film to scuff, peel or strip, and it lasts 5 to 10+ years against an acrylic's 1 to 3. The shiny jug is the one on the end-cap display. The boring one is the one you'll thank later.
New slab? Wait out the cure first
Fresh concrete is full of water that has to escape as it cures. It is, briefly, a very large sponge with plans. Seal it too early and you trap that moisture, which shows up as a cloudy, white or peeling film. Brickform's stamped concrete sealing guide gives the standard wait: about 28 days for the concrete to cure before a regular sealer goes on.
The exception is a cure-and-seal product, made to go on fresh concrete the day it's finished so it cures evenly. If your contractor used one, the next full coat comes later and must be compatible with it.
Before sealing a slab of any age, check two things:
- Is it already sealed? Sprinkle some water on it. If the water beads up and sits there, there's still sealer on the surface. If it darkens the concrete and soaks in, the slab is bare.
- Is it dry? Tape an 18-inch square of clear plastic to the slab, sealing all four edges, and leave it overnight. (Low-tech, and more reliable than squinting at it.) Condensation under the plastic or a darker patch of concrete means moisture is still coming up. Wait longer, or choose a breathable penetrating sealer.
Penetrating or film-forming: picking a concrete patio sealer
There are four families of concrete sealer, and only two really suit an outdoor patio. The 4,500-word concretesealerreview guide, product picks and all, confirmed it; epoxy's sunlight problem alone rules it out. The concretesealerreview guide to the types of concrete sealer gives these lifespans:
| Sealer type | How it works | Look | Typical life | Best patio use |
|---|---|---|---|---|
| Penetrating (silane, siloxane) | Soaks into the pores and repels water from inside | Natural, no shine, color unchanged | 5 to 10+ years | Broom-finished slabs, freeze-thaw climates, anywhere slip resistance matters |
| Acrylic (water- or solvent-based) | Forms a thin film on top | Satin to wet-look gloss, deepens color | 1 to 3 years | Stamped, stained and colored concrete |
| Polyurethane | Tough film, often a topcoat | Satin or gloss | Longer than acrylic | Heavy-wear areas, over other coatings |
| Epoxy | Thick, hard coating | High gloss | Long indoors | Garage floors. Most epoxies yellow in sunlight and can trap moisture, so they're a poor choice outdoors |
Penetrating sealers suit most plain gray patios. They don't change the look or grip, they don't peel, and when they wear out you clean and reapply. They let water vapor escape, which also makes them more forgiving on a slab with moisture coming up from below.
Acrylic sealers suit decorative concrete. Solvent-based acrylics generally darken the color more and give a deeper "wet look" than water-based versions. The trade-offs are more frequent recoating, a surface that can be slick when wet, and the risk of whitening if moisture gets trapped.
Whatever you choose, make sure it's rated for exterior use, and that it's compatible with anything already on the slab.
Stamped and colored concrete patios
Stamped patios are almost always sealed with an acrylic, because the sealer brings back the color contrast that makes the pattern read. A few extra points:
- Clear the release agent. Stamping uses a powdered or liquid release. Brickform notes that excess release and antiquing powder must be removed before sealing, or the sealer won't bond.
- Add grip. A glossy sealer on a stamped slab near a pool or on steps can be slippery. Mix in a slip-resistant additive, or choose a sealer made to be slip-resistant.
- Back-roll or crosshatch. The texture traps sealer in low spots, where it puddles and turns white. Spray it, then roll it out, and change direction between coats.
- Plan on recoats. Brickform says to reapply every few years, depending on wear. High-traffic areas and those in full sun wear first.
Prep the slab: clean, repair and open the surface
Sealer locks in whatever is on the slab, including last summer's burger. Skipping prep is the most common cause of peeling and blotchy results. UC Coatings' list of concrete patio sealing mistakes puts dirt and stains at the top.
- Clear and sweep. Remove furniture, grills and planters, and sweep off all the debris.
- Degrease and clean. Scrub oil and grill spots with a concrete degreaser. Wash the whole slab with a concrete cleaner and a stiff brush or a pressure washer, then rinse thoroughly.
- Remove efflorescence and rust. White bloom and rust spots show clearly through a clear sealer, so remove them first with a cleaner made for concrete.
- Repair cracks and spalls. Fill cracks with a concrete crack sealant and patch flaked areas. Leave the control joints open, or fill them with a flexible joint sealant rather than a rigid patch.
- Open up a smooth surface. A hard-troweled or very smooth slab may not absorb a penetrating sealer, and it may not give a film sealer enough grip. The water test tells you: if water just sits on clean, bare concrete, the surface needs light etching with a masonry etching product. Brickform notes that light etching opens the pores and allows bonding. Rinse and neutralize as the product says.
- Let it dry. The concretesealerreview FAQ calls for a clean surface that has been dry for 24 to 48 hours before sealing. After a pressure wash, don't rush it.
If the slab already has a peeling or whitened film, clean won't be enough. The old film has to be stripped first; the steps are in the paver sealer stripper guide, and they apply to a concrete slab too.
Rolling or spraying the sealer on
Thin coats are the rule. One heavy coat is the fastest route to bubbles, puddles, whitening and peeling: four problems for the price of one.
- Pump sprayer for large areas and most penetrating sealers. For solvent-based products, use a sprayer rated for solvents. Follow a spray pass with a roller if the product asks for it.
- Roller for acrylics on smooth or lightly textured slabs. Use a nap that suits the product, and keep a wet edge so you don't get lap marks.
- Brush for edges, steps, and the strip along the house.
The method:
- Cut in the edges with a brush.
- Work in sections from the far end back toward an exit, so you don't literally seal yourself into a corner.
- Apply a thin, even coat. Keep it moving, and don't let it pool in low spots or stamped texture.
- Wait the time the label gives between coats, then apply the second coat at right angles to the first.
- Keep traffic, pets and furniture off it for as long as the label says. Film sealers need longer before cars, furniture or rubber mats go on them than they need before foot traffic.
UC Coatings also warns about air bubbles: rolling too fast, overworking the sealer, or sealing in hot sun or wind all make the surface skin over before trapped air escapes.
Weather windows for sealing outdoor concrete
Pick the day as carefully as the product:
- Temperature. The concretesealerreview FAQ gives 50°F to 85°F as the ideal range, and your label may be narrower. Hot slabs make sealer flash-dry and bubble, and cold slows curing.
- Sun and wind. Seal early morning or evening, not midday on a sunny slab.
- Rain. You need a dry forecast long enough for the sealer to cure to its rain-safe stage. The label gives the time.
- Dew and sprinklers. Turn off the irrigation and don't start while there's still dew on the slab.
When to reseal a concrete patio
Repeat the water test once a year. When water soaks in and darkens the slab instead of beading, the sealer has worn out.
- Penetrating sealers: clean the slab and reapply. No stripping is needed, because there's no film.
- Acrylics: clean and apply a thin maintenance coat before the film wears through. Stack too many coats and you get a thick, cloudy build-up that has to be stripped.
- Switching types: a penetrating sealer can't soak through an old film. Strip the acrylic first.
If the patio has a paver border, seal the border with a product rated for pavers, and mask it off while you seal the slab. They often need different sealers. The guide to a concrete patio with a paver border covers how that edge is built.
Let it cure, choose breathable, and apply thin
Good concrete patio sealing comes down to three decisions. Give a new slab its roughly 28-day cure before a regular sealer goes on. Choose a penetrating silane or siloxane for a natural, low-maintenance plain slab, or an acrylic when you want to bring out stamped or colored concrete. Clean and dry the slab, then apply two thin coats in mild, still weather. Reseal when water stops beading. Until then, the slab's only job is to be walked on, and it's been rehearsing that for 28 days.
FAQ
How long after pouring a concrete patio can you seal it?
For most sealers, wait about 28 days for the concrete to cure. The exception is a cure-and-seal product, which is made to go on the day the slab is finished. Sealing earlier with a standard sealer traps moisture and can cause whitening or peeling.
What is the best sealer for a concrete patio?
For a plain broom-finished slab, a penetrating silane or siloxane sealer is usually the best fit. It's invisible, doesn't make the surface slippery, and lasts for years. For stamped or colored concrete, an exterior acrylic sealer brings out the color, with a slip-resistant additive where people walk barefoot or the slab gets wet.
Should I seal my concrete patio or leave it bare?
Seal it if you have freeze-thaw winters, de-icing salt, trees or a grill, or decorative concrete. A covered slab in a dry, mild climate can do fine bare. Penetrating sealers add protection without changing the look.
How often should a concrete patio be sealed?
It depends on the sealer. Acrylic films typically need a recoat every 1 to 3 years. Penetrating sealers last around 5 to 10 years. Do a water test once a year: when water soaks in instead of beading, it's time.
Does sealing a concrete patio make it slippery?
Film-forming sealers, especially glossy acrylics, can be slippery when wet. Penetrating sealers don't change the texture. If you use a film sealer, add a slip-resistant additive or choose a matte or satin product.
Can you seal a concrete patio with a roller?
Yes. A roller works well for acrylic sealers on smooth or lightly textured slabs. Use a nap suited to the product, keep a wet edge, and apply thin coats. On stamped concrete, spraying and then back-rolling gets sealer into the texture without puddles.