Last Updated on October 20, 2026 by Umar Farooq
Pavers sliding downhill are being pushed, a little at a time, by foot and tire loads, and the lower edge is what is supposed to stop them. The first step is to read the creep: joints opening near the top and pavers pressed together near the bottom, with the lower edge restraint leaning or out of line. The fix starts at the downhill edge, not with sand, and above a certain slope it stops being a weekend job.
Gravity does not take weekends off, so the edge cannot either.
Read the creep before you touch anything
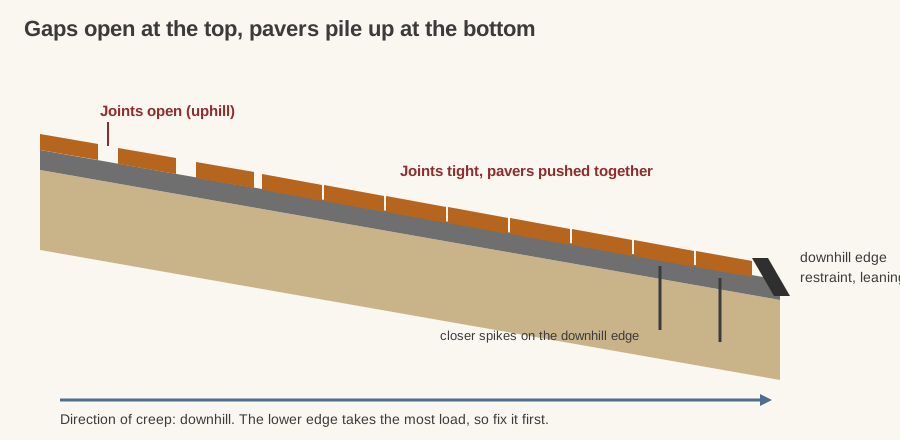
A masonry contractors' guide to pavers on steep slopes says repeated tire loading can cause horizontal creep of the units, most evident at the top of the pavement or at protrusions such as utility covers. It advises monitoring the pavement for three to six months for settlement or creep. If joints open a few millimeters, it says to fill them with joint sand and stabilize them; if the gaps are wider, relay the pavers.
Use that as a checklist:
- Run a string line along the lower edge. A bowed edge or a restraint leaning outward means the field is pushing on it.
- Check the top of the slope. Joints that have opened into visible gaps near the top, or around a manhole or drain cover, are the signature.
- Check the bottom for squeeze. Pavers jammed tight, with the bottom row lifting or tilting.
- Measure the slope. Our paver driveway slope guide shows how to measure the grade with stakes and string.
If the pavers are moving but not on a slope, or are moving sideways, see how to keep pavers from moving, which sorts the other kinds of shift.
Why pavers sliding downhill keep going
Western Interlock's guide on building pavers on a slope puts it this way: the downhill edge restraint is the primary anchor and carries the most gravitational force, side edges redirect force laterally, and the uphill edge faces the least. That is for a new build, but it is also your diagnosis. If the lower edge is the weakest link, every load is borrowing from it.
A second cause is water. The masonry guide wants a drainage mat against the upslope side of a header beam to remove water from the base and bedding sand. Water-soaked base moves more, and I could not find a published figure for how much, so I will not guess one.
A third is the slope itself. The same guide says above 7% interlocking pavement depends on careful design and construction details. That is the point where a patio laid on a tilt stops being a patio laid on a tilt.
Anchor the lower edge first
Cheaper first. If your lower edge is plastic restraint, check it before anything bigger.
- Lift the bottom two rows. Look at the restraint and the base under it. If the spikes have worked loose or the base ends at the edge, that is your answer.
- Reset it with closer spikes. Western Interlock says flat-ground stakes typically go every 12 to 24 inches, and on slopes it recommends every 8 to 12 inches along the downhill edge, longer, driven past the base into stable soil, and angled slightly uphill on steep grades.
- Extend the base under the restraint so the spikes bite stone, not soil. This is the same rule as on flat ground, and it matters more here.
- Refill the joints and compact. Do this last, because sand alone will not hold a field that is still being pushed.
Where plastic restraint will not hold, Western Interlock lists poured concrete edging or edge beams, and deadman anchors, as the options for steep slopes or challenging soil. The masonry guide's header beam is a poured concrete beam at least 6 inches wide and 12 inches deep, with one #4 bar, in 4,000 psi concrete, and it does not recommend precast or stone units for it. That is a new-construction detail. It has no retrofit section, so adapting a header to an existing driveway is my inference, and it means excavating at the bottom of a finished slope. That is a job for someone who has poured one.
Relay what is open, and look underneath
If the gaps at the top are wider than a few millimeters, the guide's advice is to relay. A few more things to check while the pavers are up:
- Base depth. Western Interlock suggests about 6 to 8 inches of compacted base on slopes, against 4 to 6 on flat ground. The masonry guide wants at least 8 inches in 3 to 4 inch lifts for steep slopes. For a flat driveway ICPI calls for at least 6 inches (ICPI Tech Spec 2).
- Pattern. The masonry guide recommends herringbone for steep slopes because it resists braking and turning forces, and says to avoid running bond and random patterns. If yours is running bond with the long joints pointing downhill, the pattern is part of the cause.
- Fabric. Western Interlock says geotextile between subgrade and base helps prevent migration and downhill creep.
- Joints. Left Coast Pavers lists too little joint sand and missing or broken edge restraints among the causes of loose driveway pavers.
Our how to fix sunken pavers guide covers the lift-and-relay sequence in detail.
Where the sources disagree
The slope limits do not line up, and I would not trust one number. The masonry guide says careful design above 7% and cites an 18% street in Colma, California, as the North American upper limit. Western Interlock says slopes under 10% are generally DIY-friendly, 10 to 20% need more experience, and above 20% it recommends professionals. Our paver driveway slope page quotes a paving company's 15% figure for asphalt. Local rules also set a maximum driveway grade.
My practical reading: if the slope is under about 7% and the lower edge is simply weak, resetting it is a reasonable DIY job. Above that, get someone who builds steep pavement to look.
Signs this has outgrown a DIY fix
- The slope is steeper than about 10%, or you cannot measure it with confidence.
- The lower edge needs a poured beam or you are digging near the street. Call 811 before you dig, and hand-dig near the marks.
- Cracked pavers, a settled retaining wall or a washed-out slope show the problem is bigger than the surface.
- A retaining wall at the bottom of the slope is leaning or bulging. See paver retaining wall.
Fixes that only slow the slide
- More joint sand alone. It does not stop a push that continues.
- A plate compactor over the top. It does not restrain anything.
- Glue between pavers. Left Coast Pavers' how-to is split on this: its steps use sand, and its FAQ mentions adhesive. I would follow the sand method, which matches the rest of the sources.
Keep the bottom edge boss
Pavers on a slope are held by their lower edge, a deep enough base, and a pattern that resists the push. Read the creep, anchor the bottom, relay the opened joints, and fix the water. If the slope is steep enough that you are shopping for a header beam, hire someone who has poured one, and let the pavers keep their pride.
FAQ
Why are my pavers sliding down my driveway?
Because the field is being pushed downhill by tires and feet, and the lower edge restraint, the base, or the pattern is not holding it. Signs are joints opening near the top and pavers pressed together at the bottom.
How do I stop pavers from moving on a slope?
Start with the downhill edge. Reset or replace the restraint, space spikes every 8 to 12 inches along it, and extend the base under it. On steeper grades a poured concrete edge or header beam does the job.
Can I fix sliding pavers without relaying them?
Only if the movement is small. The masonry guide says to fill joints that open a few millimeters with joint sand and monitor for three to six months, and to relay when gaps are wider.
What slope is too steep for pavers?
There is no single answer. One guide says above 7% needs careful design, another says under 10% is DIY-friendly and above 20% should be done by a professional. Your city sets a maximum driveway grade as well.
Does herringbone stop pavers from sliding?
It resists braking and turning forces better than running bond or random patterns, according to the masonry guide, but it still needs a restrained lower edge.