Last Updated on September 23, 2026 by Umar Farooq
Paver edging is the rigid restraint installed along the outside of a paver surface to stop the outer rows from creeping outward. It is the least photographed part of any patio, and the part I'd point to first when an edge starts drifting toward the lawn. It sits on the compacted gravel base, tight against the last row of pavers and about 1/2 inch below their surface, pinned with 10-inch spikes or locked in with concrete. The four common types are plastic, aluminum or steel, a troweled concrete toe, and precast concrete curb. Every sand-set paver patio, walkway and driveway needs one along every edge not already held by a wall or slab.
This guide is about the structural edge you mostly never see (which is the point of it). If you are choosing the visible border between a patio and the lawn, see our guide to patio edging. If you want a decorative row of contrasting pavers, that is a paver border, and it still needs a restraint behind it.
What paver edging actually holds back
A sand-set paver surface is thousands of loose units pressing against each other. Every footstep, tire and freeze-thaw cycle pushes them slightly sideways. In the middle, each paver is held by its neighbors. At the perimeter, nothing holds the outer row except whatever you install there. Without one, the outer row starts a slow commute toward the grass.
This is the one topic where I won't give you both sides. Pavers stay locked only while the field is boxed in, so every open edge gets a restraint: not the lawn, not the mulch, not "the pavers are heavy."
Without a restraint, the sequence is predictable:
- The outer row tips outward a fraction of an inch.
- The joints behind it open up and lose their sand.
- The next row loses its interlock and starts moving too.
- Weeds, ants and water get into the open joints, and the edge sinks.
The Concrete Masonry & Hardscapes Association's technical guide on edge restraints for interlocking concrete pavements (Tech Spec 3, from the former ICPI) describes restraints as the part that holds the pavers tightly together so interlock is consistent across the whole surface. I read it twice, mostly for one line: it calls for at least 1 inch of vertical restraining surface in contact with the side of the edge pavers. A strip that only catches the bottom lip of the paver is decorating, not restraining.
Four kinds of edge restraint compared
Most residential jobs use one of four restraint types, differing in strength, curve-handling and labor.
| Restraint | Best for | Handles curves? | Strengths | Weak points |
|---|---|---|---|---|
| Plastic (PVC or HDPE) edging | Patios and walkways | Yes, once the back web is notched | Fast, cheap, DIY-friendly, won't rust or rot | Can warp in sun if left exposed; needs tight spike spacing |
| Aluminum or steel edging | Patios, walkways, clean modern edges | Aluminum bends smoothly; steel less so | Thin, stiff, long-lasting | Costs more; steel must be galvanized or coated so rust does not stain pavers |
| Concrete toe (troweled edge) | Curvy layouts, mild climates | Yes, easily | Follows any shape; no spikes | Cracks and chips in freeze-thaw and on expansive clay if it is thin |
| Precast concrete curb or edging blocks | Driveways, parking pads, commercial edges | Only with curved units | Strongest option; resists tire loads | Heavy, slow to set, needs its own base |
Plastic restraint: the default for foot traffic
Plastic paver edging comes in rigid 8-foot lengths or flexible coils, with an L-shaped profile. The upright leg sits against the pavers and the flat flange lies on the base with holes for spikes. It is what most DIY patios use, and on a pedestrian surface built on a good base, it works for decades. It is also the cheapest option here, so start with it before pricing anything fancier. Buy edging made for pavers, not thin lawn edging, which has no flange and bends under load.
Aluminum and steel: thinner and stiffer
Metal restraints do the same job with a lower profile, which suits contemporary patios where you do not want to see a black plastic lip. Aluminum is light and curves smoothly. Steel is tougher but harder to bend, and it has to be galvanized or coated; CMHA's tech spec specifically warns that uncoated steel can rust-stain the pavers.
Concrete toe: shaped by hand
A concrete toe (also called a troweled edge or concrete haunch) is a wedge of concrete placed against the outer row after the pavers are laid. It follows any curve without notching, and it is the restraint most likely to fail in cold climates, because a thin wedge cracks when it freezes. Belgard's guidance on border and edging options recommends against troweled concrete curbing in northern climates, wet areas and on expanding clays for exactly that reason.
Precast curbs and edging blocks: for edges that get driven on
Precast concrete curbs, and heavy paver edging blocks set on a concrete bed, are the strongest restraints and the usual choice where tires run along the edge. CMHA's guidance for a submerged concrete curb under a residential driveway is a cross-section of at least 8 x 8 inches. For patios and walkways, that is overkill.
Where paver edging sits in the cross-section
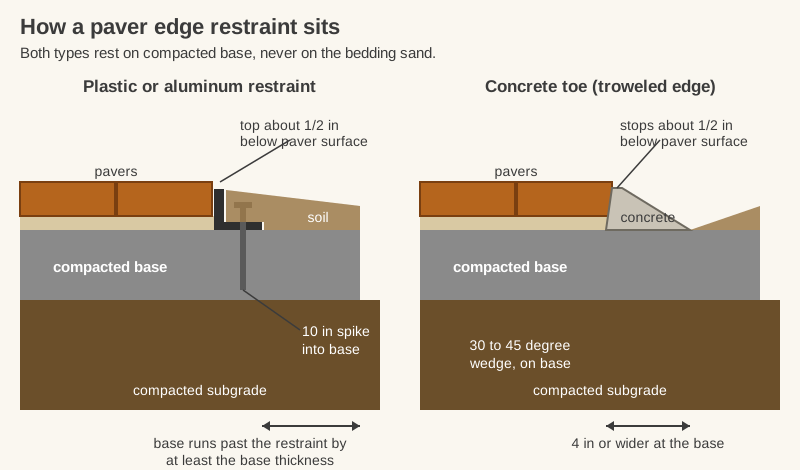
The single most important rule: the restraint sits on compacted base, never on bedding sand. Unilock's guide to installing paver edge restraints is blunt about it, and I checked two other install guides hoping one would be more relaxed. None were. Sand keeps settling, so a restraint resting on it moves with it and the edge fails.
That rule has two consequences to plan for:
- The base must run past the pavers. CMHA's rule is that the base extends beyond the restraint spikes by its own thickness, up to 10 inches. A 6-inch base runs 6 inches past the spikes, so dig and compact that shoulder when you build the base. That base is 4 inches minimum under a patio or walk and 6 under a driveway, and deeper by 2 to 4 on soggy, soft or frost-prone soil (ICPI Tech Spec 2). If you have not built the base yet, our guide to paver base covers depth and compaction.
- The sand has to be scraped back. Screed the bedding sand only as far as the pavers, or scrape it back from the perimeter with a trowel before the restraint goes in, so the flange lies flat on stone.
Set the top of the restraint about 1/2 inch below the paver surface. That hides it once soil or sod is backfilled, and it leaves room for the pavers to settle slightly during compaction without ending up below the edging.
How to install paver edging on a straight run
This is the sequence for plastic or aluminum edging, which covers most patios and walkways.
- Lay the field first, then cut the edge. Lay pavers past the finished line, snap a chalk line or run a string, and cut the edge row. The restraint goes against the cut line, not against a ragged edge of full pavers.
- Scrape back the sand. Use a trowel to pull any bedding sand away from the perimeter so the compacted base is exposed where the flange will sit.
- Set the edging tight to the pavers. Push the upright leg firmly against the outer row, with the flange facing outward and lying flat on the base. Fill any gap wider than about 3/8 inch with a cut paver; CMHA says smaller gaps can take sand or aggregate.
- Spike it. Drive a 10-inch steel spike through the flange holes into the base at the spacing in the next section. Start at one end and work along, checking that the edging stays tight to the pavers as you go.
- Join lengths properly. Butt the ends of two lengths together, or use the connector the manufacturer supplies, and put a spike on each side of the joint.
- Compact the pavers. The restraint must be in before the final pass with the plate compactor, as Unilock notes. Otherwise the compactor vibrates the outer row outward. (A rented plate does this fine. Nobody needs to own one for a single patio.)
- Backfill over the flange. Cover the edging with soil, gravel or sod. Western Interlock's edge restraint installation guide points out that plastic restraint is thermoplastic and can warp if the sun hits it, so buried edging lasts longer.
Some installers set one straight side before laying, as a starting line. That works, as long as every piece sits on base, not sand.
Spike spacing: 12 inches on a patio, 8 on a driveway
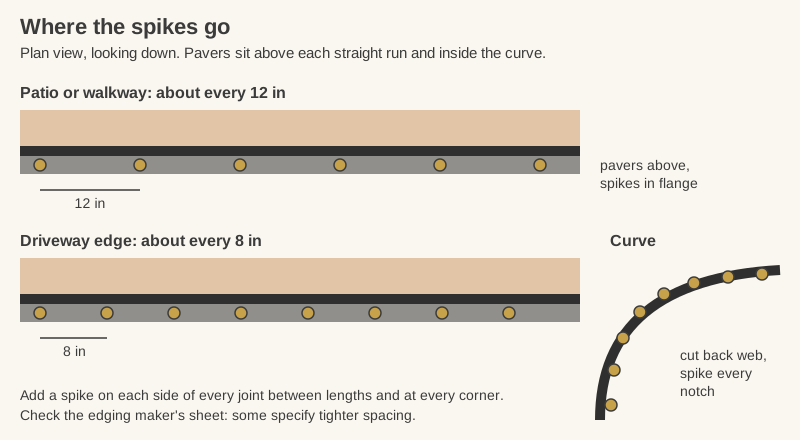
Spikes turn a plastic strip into a restraint. The common spec is a 3/8-inch steel spike, 10 inches long, driven into the compacted base. Western Interlock spaces them about every foot for foot traffic and every 8 inches where vehicles travel.
A few rules:
- Closer is better than longer. Several edging makers recommend 10-inch spikes at close spacing over longer spikes spread farther apart. A spike every 12 inches beats a 12-inch spike every 24.
- Add spikes at the weak points. Put one at every corner, on both sides of every joint between lengths, and at every change of direction.
- Go into stone, not soil. A spike that misses the base and goes into soil holds very little. That is another reason the base shoulder matters.
- Follow the product sheet. Spacing varies between brands and edging profiles. Where the manufacturer asks for tighter spacing, use it.
On sandy soil or on a thin base, go tighter still. I went looking for a patio that failed from too many spikes. I did not find one.
Bending paver edging around curves
Rigid plastic edging will not curve until you cut the thin web along its back. Western Interlock's method is to cut that web on the outer side after every third hole, using snips, a knife or a saw. The edging then flexes into a smooth arc, and each notch becomes a spike point.
Tips:
- Cut the pavers to the curve first. Mark the curve on the laid field with a garden hose or a flexible rod, cut the pavers, then bend the edging to follow the cut line.
- Spike every notch on tight curves. Curves carry more outward thrust than straight runs.
- Use coil or aluminum for long sweeping curves. Flexible edging sold in rolls avoids a run of notches, and aluminum holds a smooth radius well.
- Consider a concrete toe for very irregular shapes. On a free-form patio with many tight bends, concrete may be quicker than notching plastic, provided your climate suits it. Plastic edging with forty notches in it stops looking like a product and starts looking like a spine.
Pouring a concrete toe instead of spiking plastic
A concrete toe is placed after the pavers are laid and cut, and before final compaction.
- Expose the base. Scrape the bedding sand back about 4 to 6 inches from the outer row so the concrete lands on compacted stone.
- Mix a stiff concrete. It should hold its shape when troweled, not slump. Some installers add fiber to reduce cracking. Proprietary edge restraint mixes are sold for this job too.
- Place and shape the wedge. Tuck concrete slightly under and against the outer row, then trowel it into a wedge. Unilock describes a roughly 30-degree slope; Western Interlock describes about 45 degrees, rising about halfway up the paver. Keep the top about 1/2 inch below the paver surface so it can be covered.
- Make it wide enough. CMHA calls for a troweled edge at least 4 inches wide. A thin skin of concrete breaks off at the first frost.
- Let it cure before running the plate compactor near it, then backfill with soil.
My read of the guides: a concrete toe is fine in mild, dry climates and on well-drained soil. In a freeze-thaw climate or on clay, use plastic, aluminum or precast restraint instead, or at minimum reinforce the concrete.
Edges that don't need a restraint
You can skip edging where something rigid already holds the pavers:
- Against a house foundation, garage slab or poured concrete step.
- Against a mortared wall, or a retaining wall block that sits deeper than the pavers.
- Where the pavers butt a concrete driveway or sidewalk.
Leave a small gap against the house for flashing and weep holes, and fill it with a cut paver or joint sand. Every other edge, including the one against a lawn or a flower bed, needs a restraint. The lawn has many talents. Holding pavers is not one of them. Belgard notes the main exception is stepping-stone layouts, which are not interlocking surfaces at all.
How failing paver edging shows up
Most edge failures show within a year or two:
- A wavy line along the outer row usually means spikes too far apart, spikes that went into soil, or plastic edging warped by the sun.
- Open joints a row or two in from the edge mean the restraint moved outward and the pavers followed.
- A sunken outer row means the restraint was set on sand, or the base stopped at the paver edge instead of running past it.
- Cracked and loose concrete along the edge means a troweled toe that was too thin, or one that froze.
The repair is the same each time: lift the outer rows, fix the base shoulder, reset the restraint on stone with proper spikes, relay and compact.
Hide it, spike it into stone, and put it in before the last compaction
Good paver edging is invisible and boring. Choose plastic or aluminum for patios and walkways, precast curbs for driveways, and a concrete toe only where frost and clay will not break it. Build the base wider than the pavers, keep the restraint off the sand, set it about 1/2 inch below the surface, and spike it every 12 inches, or every 8 inches where cars go. Install it before the final compaction pass. Then bury it and forget it exists. If nobody ever mentions your edging, it worked.
FAQ
Do pavers really need edging?
Yes, on every edge that is not held by a wall, slab or foundation. Without edging, the outer rows move outward under traffic and frost, the joints open, and the interlock across the whole surface loosens. Stepping stones set individually in a lawn are the exception.
What is the best paver edging for a patio?
For most patios, plastic or aluminum edge restraint spiked into the compacted base is the best balance of cost, strength and ease of installation. Aluminum gives a lower, cleaner edge; plastic is cheaper and easier to cut. Use precast concrete curbs where vehicles will drive near the edge.
Should paver edging be installed before or after the pavers?
Either works, but it must be in place before the final compaction of the pavers. Many installers lay the field, cut the edge row to a string line, and then install the restraint against the cut edge.
How far apart should paver edging spikes be?
About every 12 inches for patios and walkways, and about every 8 inches for driveways and on tight curves, using 10-inch spikes. Always add spikes at corners and on both sides of any joint between edging lengths, and follow the manufacturer's spacing if it is tighter.
Can you put paver edging on top of the sand?
No. Edging on bedding sand moves as the sand settles and shifts. Scrape the sand back so the restraint sits on the compacted gravel base, and make sure the base extends beyond the pavers so the spikes have stone to grip.
Is concrete better than plastic paver edging?
Precast concrete curbs are stronger than plastic and are the better choice for driveways. A troweled concrete toe is not automatically better: in freeze-thaw climates and on clay it often cracks and chips, while spiked plastic or aluminum on a good base keeps working.