Last Updated on October 20, 2026 by Umar Farooq
A raised paver patio is a ground-level patio built on top of a box of compacted fill, held in by a segmental retaining wall. To build one, set the first course of wall block on a buried gravel leveling pad, put clean drainage stone and a drain pipe behind the wall, fill the middle in thin compacted lifts, then lay a normal base, 1 inch of bedding sand and the pavers on top, and glue caps along the wall. It is the answer when the yard falls away from the door and digging down would leave you with a pit. In effect it is a retaining wall that has agreed to be furniture.
This guide covers the build from the wall up. If your site only slopes gently and you would rather cut and fill than build a wall, start with our guide to a paver patio on a slope.
When an elevated paver patio makes sense
Raising the patio is more work than digging in, so it has to earn its keep. It usually does in three situations:
- The door sits high above the yard. A back door two or three steps up means a grade-level patio needs steps down onto it. A raised patio brings the surface up to a comfortable single step below the threshold.
- The yard slopes away from the house. Building on grade would mean a deep cut at the high side, or a patio that tilts. A wall on the low side levels it out.
- The ground stays wet. Lifting the patio above soggy soil keeps the base out of standing water, as long as the fill drains.
If none of those apply, a grade-level patio is cheaper, faster and has no wall to fail. Build the wall only when the site asks for it.
Height decides permits, railings and engineering
The taller the wall, the more rules apply. These are the thresholds the guides and code I read agree on:
| Finished height above grade | What changes |
|---|---|
| Up to about 24 in | Typical DIY wall-block job; check the block maker's height chart |
| More than 30 in within 3 ft of the edge | IRC R312.1.1 requires a guard (railing) on the open side |
| Over 3 ft | Unilock's guide says expect a permit and have a civil engineer design the wall |
I checked the guard rule on Building Code Trainer's summary of IRC R312.1: a guard is needed where the walking surface is more than 30 inches above the grade below at any point within 36 inches of the edge, and it must be at least 36 inches tall. Local amendments vary, so ask your building department before you order block. A railing also changes how the patio feels, which is a good reason many raised patios stop at about two feet: high enough to fix the slope, low enough to skip the guard.
Work the finished height back from the door
Everything starts at the top. Mark the finished paver height on the house or a stake, then work down:
- Threshold first. Keep the paver surface below the door sill by a comfortable margin so rain and snowmelt can't run inside.
- Build in the slope. Hard surfaces within 10 feet of the foundation should fall at least 2% away from it, about 1/4 inch per foot (IRC R401.3). On a 12-foot-deep patio that is 3 inches lower at the wall than at the house.
- Keep the siding dry. Wood siding and framing need at least 2 inches of vertical clearance above a patio surface (IRC R317.1). Never bank fill against siding to gain height.
- Count whole courses. Block comes in fixed heights, so set the finished height to whole courses of block plus the cap, then add one extra course below grade. Cutting a course in half to hit a number is where the wall starts to look improvised.
Draw it on graph paper at this stage. Both manufacturer guides start there, and it is the cheapest place to discover that the patio needs a step down to the lawn.
Set the first course on a buried gravel pad
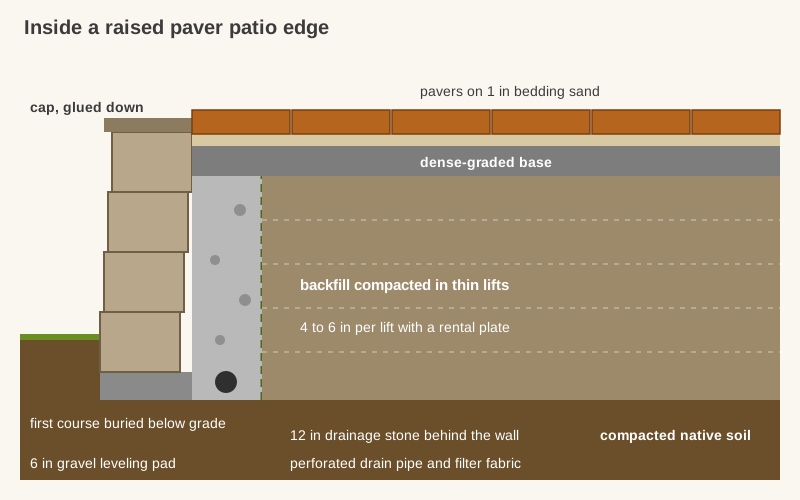
The bottom course carries the whole wall, so it gets the most care. Allan Block's raised patio instructions size the trench at 24 inches wide and 6 inches deep, plus 1 inch of depth for every foot of wall height. Western Interlock's tutorial buries the first course at least 4 inches below grade.
- Compact the trench bottom first, then place and compact the gravel leveling pad.
- Level the pad side to side and front to back. Allan Block allows up to 1/2 inch of coarse sand under the blocks to fine-tune them.
- Get the first course perfect. Level each block both ways and check the line with a string. Every error in the first course is copied, and slightly enlarged, by every course above it.
- Stagger the joints on the courses above, like brickwork, and sweep each course clean before placing the next.
Give water a way out from behind the wall
A retaining wall's worst enemy is water trapped behind it, because saturated fill pushes harder and freezes. Allan Block specifies 12 inches of wall rock (clean crushed drainage stone) directly behind the block. Put a perforated drain pipe at the bottom of that zone and run it out to daylight, and wrap the soil side in filter fabric so fines can't clog the stone. (The drain pipe is the least glamorous thing you will buy for this project, and the one the wall quietly depends on.) Worth a read next: shed base pavers.
The drainage zone goes up with the wall, course by course. It is much harder to add it once the fill is in.
Compact the core in thin lifts
This is where raised patios succeed or sink. I compared the backfill instructions in all three guides and got three different lift thicknesses: Allan Block allows up to 8 inches, Unilock places 3/4-inch clear stone in 6-inch layers, and Western Interlock starts at 2 inches and never goes above 4. My opinion is to take the thinner number. ICPI's 4-to-6-inch lift assumes a big 7,000 lbf reversible plate, and it says smaller plates need thinner lifts. The plate at a rental counter is usually the smaller kind.
The mechanism is simple. A plate compactor densifies the top few inches best and loses effect with depth. Place 8 inches at once and you get a firm top over looser fill, which settles later under the pavers. On a raised patio that settlement doesn't spread evenly. It collects along the wall, where the fill is hardest to reach, and shows up as a dip beside the cap and a row of pavers tipping toward the edge.
So, in practice:
- Place 4 inches of fill, dampen it if dry, and make at least two overlapping passes.
- Bring the fill up at the same rate as the wall, so every course is backed as it goes on.
- Keep the plate a few inches off the back of the block, and use a hand tamper right against it.
- Don't build the core from topsoil or clay. Use clean stone or dense-graded base.
Rent the compactor for the whole build rather than buying one. Our guide on how to compact gravel covers passes and moisture.
Finish the top like any other patio
Once the core is up to the level of the base, the top is a standard patio build:
- Lay and compact the final base layer to the slope you drew, flat to 3/8 inch over 10 feet.
- Screed 1 inch of loose concrete sand. Don't compact it before laying.
- Lay the pavers from the house outward, with the wall as your edge restraint. Cut the pavers to meet the back of the cap, or run them under a cap overhang if your system allows it.
- Compact the pavers and fill the joints.
- Glue the caps to the top course with a masonry adhesive, leaving a small overhang on the outside.
Cap sizes, overhang and bullnose profiles are covered in our guide to paver caps.
Steps down to the lawn

A raised patio needs a way off it. Build the steps from the same wall system, each on its own compacted base, and keep them to the IRC's limits: risers no taller than 7 3/4 inches, treads at least 10 inches deep, and no more than 3/8 inch of variation between steps. Four or more risers need a handrail on at least one side.
Wide, shallow steps also make good extra seating, which is how many raised patio ideas end up looking bigger than their square footage.
Every lift is part of the raised paver patio
A raised paver patio lives or dies inside the wall, in fill nobody will ever see. Bury the first course on a level pad, drain the back of the wall, bring the fill up in thin lifts with the wall, and only then think about which paver to put on top. The wall holds the fill in. The fill will spend every winter trying to leave, so make it too dense to bother.
FAQ
How high can a raised paver patio be without a railing?
Under the IRC, a guard is required where the patio surface is more than 30 inches above the grade below within 36 inches of the edge. Many raised patios stay at about 24 inches to avoid a railing. Local codes vary.
Do you need a permit for a raised paver patio?
Often not for low walls, but rules vary by town. Unilock's guide says walls over 3 feet usually need a permit and an engineer's design. Check with your building department before ordering block.
What do you fill a raised paver patio with?
Clean crushed stone or dense-graded base, compacted in thin lifts of about 4 inches with a rental plate. Avoid topsoil, clay and organic material, which settle and hold water.
Can you build a raised patio against the house?
Yes, but slope the surface at least 2% away from the foundation and keep it at least 2 inches below wood siding. Never let fill bury siding or block weep holes.
How long does it take to build a raised paver patio?
Longer than a grade-level patio of the same size. The wall, the drainage zone and the thin lifts of fill are all extra, and the fill cannot be rushed.