Last Updated on October 20, 2026 by Umar Farooq
Paver caps are the flat finishing units set on top of a seat wall, retaining wall, pillar or step. They're usually 2 to 4 inches thick and a little deeper than the wall, so they overhang its face by about 3/4 inch on a retaining wall and 1 to 2 inches on each side of a freestanding seat wall. They're glued down with a flexible concrete adhesive, not mortared, on any dry-stacked block wall. Get the size, the overhang and the adhesive right and the cap does three jobs at once: it hides the hollow cores and rough top of the block, sheds water off the wall face, and gives people somewhere to sit.
The most useful document I found on the subject is a four-page caps bulletin from the retaining-wall maker VERSA-LOK. It's short, a little dry, and more practical than most of the glossy pages that rank for this term.
What counts as a paver cap
The words overlap, so here's how they're used:
- Wall caps sit on retaining walls, seat walls, garden walls and pillars. This is what most people mean by paver caps, and what some sellers call paver toppers.
- Coping is a cap along an edge people use: a pool's rim or the front of a step. Pool coping has its own rules; our bullnose pavers guide covers the 1-inch pool overhang.
- Treads are caps used as the walking surface of a step built from wall block.
- Pillar caps are single square pieces sized to a column, usually with an overhang on all four sides.
Most systems sell caps made to match their wall block in color and texture. Natural stone (bluestone, limestone, granite) and precast concrete slabs are the other common choices.
Paver cap sizes and how to match them to the wall

A cap is sized from the wall, not the other way round. On a raised paver patio, for example, the cap is the last course of the retaining wall and the edge everyone steps over, so its depth and overhang matter as much as a step's. Work it out like this: For the full picture, see curved paver steps.
Cap depth = wall depth + overhang on each exposed face.
A 12-inch-deep retaining wall with a 3/4-inch overhang on the front wants a cap about 12 3/4 inches deep. A 12-inch freestanding seat wall with 1 1/2 inches on both sides wants 15. Off-the-shelf caps fall in that range. Big-box stores sell 6 x 13 inch bullnose cap units, and wall systems sell tapered caps sized to their own block. The same arithmetic covers the counter on an outdoor kitchen or bar base. Worth a read next: outdoor bar dimensions.
| Where it goes | Typical overhang | Profile that suits it |
|---|---|---|
| Retaining wall | about 3/4 in, front only | split, chiseled or straight |
| Seat wall | 1 to 2 in, both faces | bullnose or eased |
| Step tread | 3/4 to 1 1/4 in nosing | bullnose or straight |
| Pillar | 1 to 2 in, all sides | straight or peaked |
Two checks before you order:
- Measure the wall along its face, including curves. VERSA-LOK's bulletin warns against using the straight-line distance on a curved wall, because it undercounts.
- Count the caps from length. VERSA-LOK's own figure is 0.86 caps per lineal foot of wall for its units; other systems publish their own. Round up and add extra for saw cuts and splits at corners, steps and ends.
How far should a paver cap overhang?
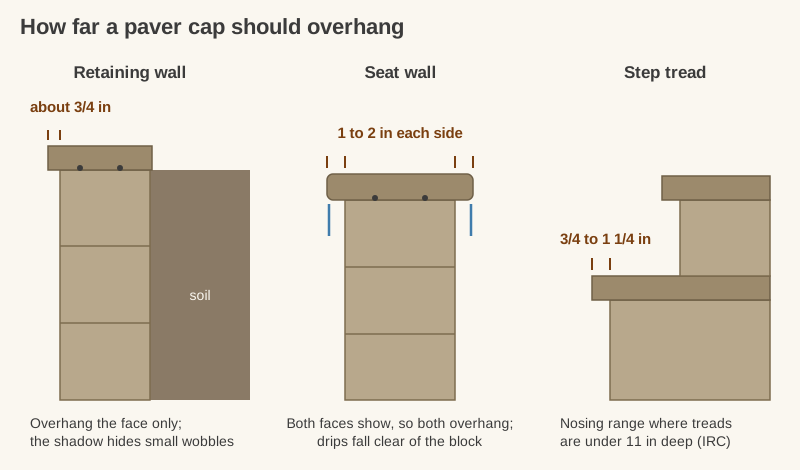
VERSA-LOK's caps technical bulletin says caps can sit flush, set back or overhanging, and prefers an overhang of about 3/4 inch, which it calls an "eyebrow." That small shadow line does two useful things: it looks finished, and it hides minor wobbles in the wall below. Homedit's retaining wall caps guide puts the usual range at 1 to 2 inches, which is where seat walls and pillars tend to land.
Steps are the exception, because a code applies. Where a cap is the tread of a stair, the 2021 IRC (R311.7.5.3, via UpCodes) asks for a nosing projection of 3/4 to 1 1/4 inches. The largest and smallest nosing in one flight can't differ by more than 3/8 inch. No nosing is needed where the tread is at least 11 inches deep. Check what your local building department has adopted.
Where the overhang goes wrong, and how to tell:
- Too little, or none: rain runs straight down the wall face instead of dripping clear, and the face streaks or blooms white. Flush caps also show every block that sits slightly proud.
- Too much: the cap becomes a lever. Someone sits on the edge, or steps on a tread nosing, and the bond takes a load it was never meant to. A cap that rocks when you press its outer edge is overhanging too far for its thickness.
- Uneven: a line of caps that wanders in and out by 1/4 inch is more noticeable than any overhang size. Run a string line along the back of the caps to keep the front consistent.
Bullnose, straight or split: choosing a cap profile
The profile is the shape of the cap's exposed edge. Homedit sorts them into square, bullnose, chiseled and peaked:
- Bullnose (rounded): the comfortable choice anywhere people sit, lean, or walk barefoot. It's kinder to the backs of knees on a seat wall and to shins on a step.
- Straight or square: clean and modern, and it matches large-format slabs and linear pavers. The crisp edge chips more easily if it's hit.
- Split or chiseled face: rough, rock-like edges that match split-face retaining wall block. Good on walls you look at, poor for sitting.
- Peaked or sloped: sheds water to both sides. Mostly seen on freestanding walls and pillars.
Dark caps in full sun get hot enough to notice. On a seat wall in a hot climate, a lighter cap is the kinder choice. (It's also one of the few design decisions your legs will vote on directly.)
Curved walls and corners

Rectangular caps on a curve leave wedge-shaped gaps, so most systems make tapered caps. VERSA-LOK's A and B caps are the same width at the front and taper to different widths at the back, and the rules in its bulletin apply to most systems:
- Outside (convex) curves: use the caps that taper most, with the wide end at the face.
- Inside (concave) curves: use the other shape, or mix both on gentle and serpentine curves.
- Keep the front joints tight. Take up the curve with gaps at the back instead. Gaps of up to 1/2 inch at the back are considered acceptable. Wider than that, saw-cut the sides of the caps.
- Start at corners and fixed ends, work toward the middle, and fill the last gap with a partial cap at least 4 inches wide. A 2-inch sliver looks like an afterthought and tends to break.
- Split, don't saw, exposed ends on split-face systems, so a corner or a step-down shows a rough face that matches the rest. VERSA-LOK needs at least 2 inches of material for a clean split.
Glue, don't mortar, caps on block walls
On a dry-stacked segmental wall (the interlocking block most patios use), I would not put mortar under a cap, and neither would the people who make the block. VERSA-LOK's bulletin says it directly: "Do not use rigid adhesives or mortar to secure caps." The reason is movement. These walls flex slightly, especially where the ground freezes and thaws, and a rigid bond cracks at the first shift. Then the cap is loose and you have a crumbly line of mortar to chip off. A flexible concrete adhesive moves with the wall and keeps its grip.
The method in the bulletin, in short:
- Dry-lay four or five caps, check the line and overhang, then lift them off and brush the top course clean.
- Run two continuous 1/4-inch beads of adhesive on the block, set the group back down and press it firmly into place.
- Don't apply adhesive to wet block. It won't stick.
- Allow 2 to 3 days of warm weather for the adhesive to cure. In the cold, keep the tubes warm before use.
- On steps, keep people off until the caps are fully secure.
Choosing an adhesive and handling squeeze-out are covered in our paver adhesive guide. The one place mortar is normal is a rigid structure: a poured concrete or mortared block wall, or pool coping on a concrete bond beam.
Size it from the wall, overhang it modestly, glue it flexibly
Good paver caps come down to three decisions. Size the cap from the wall depth plus the overhang you want: about 3/4 inch on a retaining wall, 1 to 2 inches per side on a seat wall, and 3/4 to 1 1/4 inches of nosing on a step. Pick a profile for how the wall will be used, not just how it looks. Then glue the caps down with two flexible beads rather than mortar, and give the adhesive days, not hours. The wall will move a little with the seasons. The caps just need to be allowed to move with it.
FAQ
What is a paver cap?
A paver cap is a flat finishing unit set on top of a wall, pillar or step. It covers the top of the block, overhangs the face slightly so water drips clear, and provides a smooth surface to sit or step on. Caps are usually made to match a wall block system, or cut from natural stone.
How much should a wall cap overhang?
About 3/4 inch on the face of a retaining wall, per VERSA-LOK's caps bulletin, and 1 to 2 inches on each side of a freestanding seat wall or pillar. Step treads need a 3/4 to 1 1/4 inch nosing under the 2021 IRC where the tread is less than 11 inches deep.
Should wall caps be glued or mortared?
On dry-stacked segmental block walls, glue them with a flexible concrete adhesive. VERSA-LOK warns against rigid adhesives and mortar because these walls move slightly, especially in freeze-thaw climates, and a rigid bond cracks. Mortar is normal only on rigid walls such as poured concrete or mortared block.
Can you use regular pavers as wall caps?
On a low garden edge, yes, if the paver is deep enough to cover the wall and overhang it. On seat walls and steps, use caps made for the job. They are thicker and deeper and have a finished edge. A standard 4 x 8 paver is too narrow to cap most walls in one piece.
How thick should wall caps be?
Use the cap made for your wall system, since it is sized to the block. For seat walls, Landscaping Network puts the minimum at 2 inches, and a thicker cap can overhang further without rocking. Thin veneer stone belongs on a wall only where its maker rates it as a cap.
How do you cap a curved retaining wall?
Use tapered caps, with the wide end at the face on outside curves. Keep the front joints tight and let small gaps of up to about 1/2 inch open at the back. Start at the ends and corners, and fill the final gap with a partial cap at least 4 inches wide near the middle of the run.