Last Updated on October 20, 2026 by Umar Farooq
The common paver installation mistakes are nearly all hidden ones. A thin or fluffy base, dirt used as fill, bedding sand piled too deep, no edge restraint, a flat surface that holds water, and joint sand that went in at the wrong moment. Everything above the sand looks fine on day one, which is exactly why these errors get made and why they show up a season later as sinking, wobbling or weeds.
This guide goes through them in the order they happen, with the number or spec that prevents each one. Most come from the ICPI and CMHA installation specs, with Unilock's and Western Interlock's lists as a cross-check.
Common paver installation mistakes at a glance
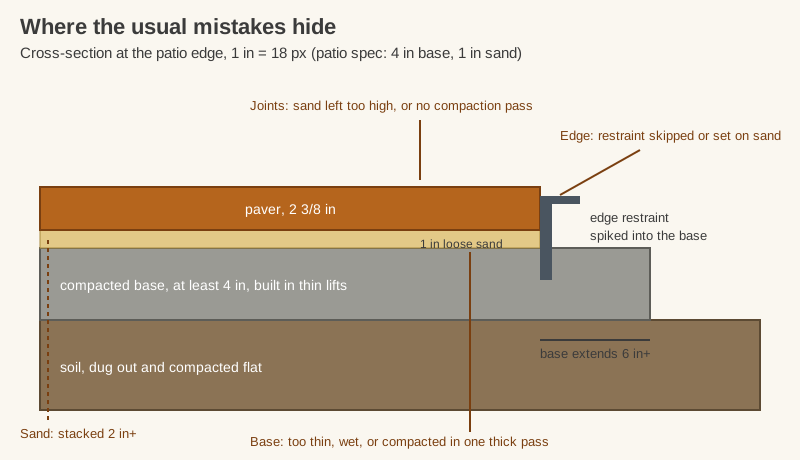
The layers carry the loads, so mistakes in them show up as the same few symptoms:
| Mistake | What you see | Typical timing (my read) |
|---|---|---|
| Base too thin or poorly compacted | Dips, ruts, rocking pavers | First wet season |
| Dirt used as fill under the base | Settling over a whole area | Within months |
| Bedding sand too thick or compacted first | Uneven surface, loose pavers | Right away or after rain |
| No edge restraint, or on top of sand | Outer rows creep out, joints open | First year |
| Surface too flat | Puddles, ants, algae | After the first storm |
| Pavers from one bundle, long straight joints | Color patches, rows that drift | At install |
| Skipping the compaction pass, or running the plate bare | Loose pavers, chipped faces | At install |
Dig deeper than you think, and call 811 first
The shovel mistakes come first. Digging without calling 811 is one, since the free national service exists so utilities get marked before you hit them. Another is digging too shallow. Unilock says patios, pool decks and walkways need excavation of roughly 10 to 14 inches depending on the subsoil, and driveways up to 16 (Unilock). That depth is base plus 1 inch of sand plus the paver, plus a little for the soil you remove. People hear "4 inch base" and dig 4 inches. The paver and sand are on top of that.
I'd rather you over-dig by an inch and fill it with base stone than find out later the patio sits higher than the door threshold. Measure the finished height first, then work backward.
Base that is too thin, wet or compacted in one thick pass
ICPI Tech Spec 2 calls for at least 4 inches of compacted base under a patio or walkway on well-drained soil, and at least 6 inches under a residential driveway. Add 2 to 4 inches more in cold climates or on wet or weak soil (ICPI Tech Spec 2). Those are minimums, not targets. For the full reasoning, see paver base.
Compaction is where good intentions go wrong. The spec's 4 to 6 inch lifts assume a 7,000 lbf reversible plate, and the same sentence says thinner lifts are needed for compactors around 5,000 lbf. Unilock's guide goes further: most plate compactors may only compact about 4 inches at a time, so it lays crusher run in 3-inch layers. A rental plate is often the smaller kind, so thin lifts are the safe choice. Spread, compact, spread again. Skipping this is the single most expensive mistake on the list, because the fix is to lift the pavers and rebuild.
Dirt is not base
Western Interlock lists backfilling with dirt as its first mistake: it says dirt shrinks by 30% when compacted, and that 10 inches of dirt could let the pavers settle about 3 inches (Western Interlock). I could not find an independent test of that exact figure, so treat 30% as one installer's rule of thumb rather than a lab result. The mechanism is easy to believe, though. Soil fill holds air and water, and angular crushed stone with fines locks together. When you need depth, buy stone.
Bedding sand: one inch, loose, and never a filler
The ICPI spec is specific: bedding sand is spread and screeded to a nominal 1 inch, uncompacted. CMHA's guide spec adds "Do not disturb screeded sand." Two mistakes follow from ignoring that:
- Using sand to correct a lumpy base. Two inches in a low spot compacts differently from one inch beside it, so you have scheduled a dip. Fix the base instead. CMHA's tolerance is plus or minus 3/8 inch over a 10 foot straightedge.
- Using the wrong sand. CMHA specifies ASTM C33 concrete sand for bedding, and says stone dust, limestone screenings and mason sand do not belong there.
Rails, boards and the step-by-step are covered in screeding sand for pavers.
No edge restraint, or restraint sitting on sand
Pavers interlock only if their outer row can't move outward. Unilock's guide says to extend the base at least 6 inches beyond the paver edge, so the restraint is spiked into compacted base rather than into bedding sand. A restraint resting on loose sand lets the edge row creep, and the whole field follows. Details on types and spacing are in paver edging.
A flat patio holds the rain
Water on the surface has to go somewhere, and a flat paver surface sends it into the joints and base. ICPI's Tech Spec 2 gives 1.5% as the minimum surface slope, and the IRC (section R401.3) asks for at least 2% away from the foundation within 10 feet of the house. Two percent works out to about 1/4 inch per foot. Unilock's guide says the same figure and suggests checking it with a level on an 8 to 10 foot board. Slope is built into the base, not the sand. Check your local code, since adoption varies.
Laying habits that show: bundles, straight joints and sliding
Three mistakes appear once pavers start going down:
- Pulling from one bundle. Unilock says to pull pavers from at least three bundles at a time to balance color variation. A pallet is not a uniform product, and the difference shows as blotches.
- Long straight joint lines. Western Interlock says never let four corners meet, and never let a joint run in a straight line for more than about nine feet. Long lines shift under load and stand out to the eye.
- Sliding pavers into place. Western Interlock calls the alternative click and drop: place each paver down onto the sand rather than dragging it, because bulldozing disturbs the bed and fills the spacer-bar joints. Aim for no more than 1/8 inch of lippage between neighbors on pedestrian routes (ICPI).
Joint sand: after the first compaction, below the chamfer
The order is cut, sweep the surface clean, compact the pavers using a protective pad under the plate, then sweep sand into the joints. Unilock lists the compaction pass before joint sand as a step that gets skipped or done without a pad, and scratched or chipped faces are the result. Then keep the sand about 1/8 inch below the chamfer. Alliance Gator's data sheet for SuperSand G2 says finished sand should be at least 1/8 inch below the paver top or chamfer, with a minimum joint depth of 1 1/2 inches. The product on your bag has its own numbers, and they win. For method, see how to apply polymeric sand.
Already made one? Start with the sinking
If a mistake has already shown up, the usual first symptom is a dip. Measure it, find which layer failed, and rebuild that layer, not just the paver. The process is in how to fix sunken pavers.
Get the layers under the sand right, and the rest forgives you
Almost every error above sits below the sand line. Deep enough dig, 4 inches or more of compacted base in thin lifts, a loose 1 inch of the right sand, a restraint on the base and a slope of at least 1/4 inch per foot do most of the work. Pavers laid slightly crooked still last. Pavers laid on a bad base do not, however nicely they are cut.
FAQ
What is the most common mistake when installing pavers?
A base that is too thin or poorly compacted. It is hidden under the sand, so nobody sees it until the surface dips. ICPI's minimum is 4 inches of compacted base for patios, 6 for driveways, compacted in thin lifts.
Why do pavers sink after installation?
Usually the base or the soil under it moved: thin base, dirt fill, wet soil or poorly compacted lifts. Water that gets under the surface through joints or from a flat grade makes it worse.
Can bedding sand be too thick?
Yes. The spec is about 1 inch, screeded and left uncompacted. Thicker sand compresses unevenly and leaves dips, so level the base rather than adding sand.
Do pavers need edge restraints?
Yes on every edge not held by a wall, slab or foundation. The restraint should be spiked into the compacted base, which extends at least 6 inches beyond the pavers per Unilock.
Should I compact pavers before or after joint sand?
Compact the pavers first, with a protective pad, then sweep in the joint sand and compact again as the sand's instructions say. Skipping that first pass, or running the plate bare, is a mistake Unilock lists.